Learn how to schedule a meeting in Teams.
Desktop
here are several ways to schedule a meeting in Teams:
-
Select Schedule a meeting  in a chat (below the box where you type a new message) to book a meeting with the people in the chat.
-
Go to Calendar  on the left side of the app and select New meeting in the top right corner.
-
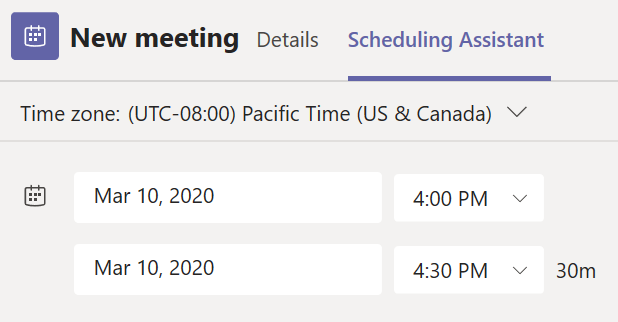
Select a range of time in the calendar. A scheduling form will pop open.
The scheduling form is where you'll give your meeting a title, invite people, and add meeting details. Use the Scheduling Assistant to find a time that works for everyone.
Once you're done filling out the details, select Save. This will close the scheduling form and send an invite to everyone's Outlook inbox.
Assign categories to a meeting
Color code your calendar with categories. Just like in Outlook, you can assign one or more categories to each meeting in your calendar. There are a couple ways to assign categories:
-
Right-click an event in your calendar and select Categorize, then pick a color.
-
When scheduling a meeting, select Category at the top of the scheduling form.
Notes:
-
At this time, category names and colors can only be edited from Outlook.
-
For recurring meetings, categories can only be applied to the series, not an individual occurrence.
-
Currently, categories can't be applied to channel meetings.
Invite people outside your organization
Teams lets you invite people outside your organization, including those who don't have a Teams license. You'll need their full email address to invite them.
-
Go to where it says Add required attendees. If anyone is an optional attendee, select Optional instead.
-
Type the person's full email address (ex: Joe@example.com).
-
Select Invite. They'll receive an email with a link to the meeting.
Add a co-organizer
Note: Adding a co-organizer is available as part of the public preview program and might undergo further changes before being released publicly. To get access to this and other upcoming features, switch to Teams public preview.
After you've invited people to your meeting, you can add up to 10 co-organizers to help manage your meeting. Before adding co-organizers, make sure the people you want to add are already added as required attendees and then follow the steps below:
-
Select your meeting and then select Edit.
-
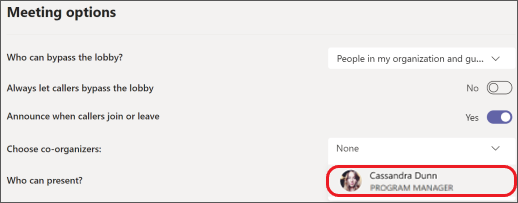
Select More options  > Meeting options.
-
On the meeting options page, next to Choose co-organizers, select the down arrow and choose the name of the co-organizer.
-
Select Save at the bottom of your screen.
Note: To learn more, see Add co-organizers to a meeting.
Make it a channel meeting
-
Select New meeting.
-
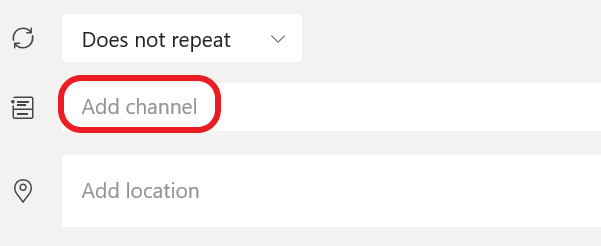
Type the name of a channel where it says Add channel (under the time and date fields).
Channels can't be edited or added once the invite is sent. You'll need to send a new invite with the updated channel.
Note: When you have a meeting in a channel, everyone in the team will be able to see it and join it in that channel. This feature isn't available in private channels.
Once you've added the people you want, select Scheduling Assistant to find the best time.
If it's a recurring meeting, open the dropdown menu next to Does not repeat (just below the date). Choose how often you want it to occur from the default options, or select Custom to create your own cadence.
Schedule meetings in a channel calendar
If you're unfamiliar with how to add a calendar to a channel, the steps are outlined for you at See all your meetings in Teams. Once that's done, you have a few ways to add events to the shared calendar.
-
Select Add new event at the top of the calendar.
-
Click and drag your cursor on the calendar to select a block of time.
-
Or, select the arrow next to Meet now at the top of the app to open the menu and select Schedule meeting.
Each of these actions will open the scheduling form with the channel name filled in, feel free to add an Outlook group or individuals by manually entering their names. Guests and partners from outside your org won't have access to the channel calendar and will also require being added to the meeting invite.
Right-click for more options
Right-click an event in your calendar to RSVP, remove it if it's canceled, or open the invitation to view the meeting details. If the event is a Teams meeting, you'll also get options to Join online and Chat with participants.

Teams meetings will show a join button on an event in your calendar five minutes before the start of a meeting. Once someone joins the meeting, the event will change colors to let you know they're online.
Select Join to open the meeting settings window to confirm your preferred camera and mic settings before joining the online meeting.
Note: If you have overlapping meetings in your calendar, the join button won't be available. But you can still right-click the event and select Join online.
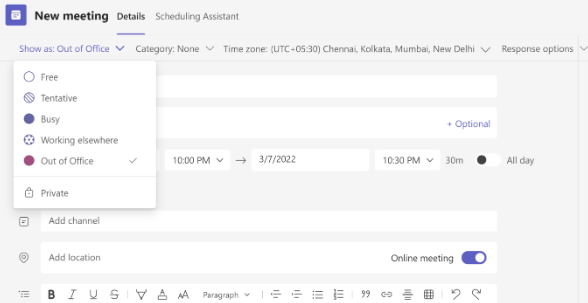
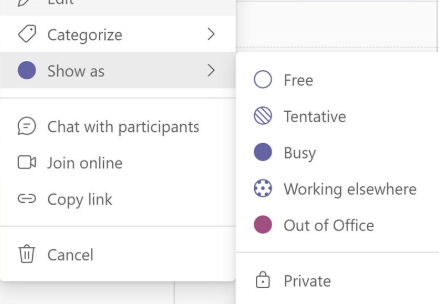
Set your Show As status in a Teams meeting
As an organizer, you can set the Show As status of the meeting in the action bar. When participants RSVP, their status will automatically reflect the status the organizer set.
As a participant, you can choose to set your individual status for the meeting through Show As independent of the status set by the organizer. The updated status will reflect on your calendar. The default Show As value for all the meetings an organizer schedules is Busy.
You can set your Show As status in several ways:
On the Scheduling Form Details page
On your Peek of the meeting (Microsoft Surface)
On the Details view of the meeting (as a participant)
