Creating, attending, and running meetings are fundamental to distance learning. Below are a set of guidelines and information for managing meetings with Microsoft Teams.
Switching to online learning can present a new set of challenges for your classroom. Microsoft Teams can help you create and host meetings for your virtual classroom. Check out the various topics or see our distance learning center for more assistance.
Adjust your view in a meeting
Teams tries to anticipate what you’ll want to see in a meeting. If someone starts speaking, their video or profile image is shown more prominently. If someone shares their screen, that content will take main stage.
But if you'd rather see something else, there are a few ways to tell Teams.
-
Switch between people and content - If someone's presenting a PowerPoint or other content, switch between viewing their content and the people in the room by clicking the video or content you want to see.
-
Pin a video - Right-click a video within the meeting and select Pin. The video will be shown regardless of who's currently speaking. You can pin multiple videos or right-click any pinned video and select Unpin at any time.
-
Reframe a video - Teams may crop your video to better fit the screen. If you want to change this, right-click the video and select Fit to frame to view the entire video. To see a closer, cropped view, right-click the video and select Fill frame.
How to schedule an online class meeting in Teams
here are two ways to schedule meetings in Microsoft Teams: scheduling in the calendar or using the Meet Now option.
To schedule a meeting using the calendar, follow these steps.
- Open Microsoft Teams.
- Select Calendar in the app bar, then select New meeting.
- Enter a meeting title, invite others, and add details describing the purpose of the meeting. Hosting a meeting with multiple people? After you add required and optional attendees, use the Scheduling Assistant to find a time that best aligns with their schedules.
- Once you're done filling out the details, select Save. This will close the scheduling form and send an invite to everyone's email.
If you'd like to use the Meet now functionality, see Create Instant Meetings with Meet now.
Set up and change meeting options
esignate roles that affect what others can see and do when joining a meeting. For example, an attendee can use their microphone and video camera and view content shared by others, but they cannot share their own content or add or remove other attendees.
For more information on different roles you can assign to participants when organizing meetings, see Roles in a Teams meeting.
To change presenter permissions:
- Open the meeting from your calendar, and then select Meeting Options.
- Use the Who can present dropdown to choose who you want to give presenter permissions to.
Create your meeting in an existing channel
f you have an existing class team, you can create your meeting within that team's channel.
Navigate to the class team and select the dropdown arrow next to Meet. Choose Meet Now to start a meeting right away, or Schedule a meeting to organize a meeting for later.
Tip: If you want to have a breakout group or groups within a specific class, you can use a private channel. Create a private channel for each project group so you can easily meet with each project group individually and quickly. For more information on creating a private channel, see Standard and Private Channels.
Send information to students/participants before a meeting
irtual meetings can be an adjustment for anyone. Oftentimes it's helpful to send information about meeting best practices, etiquette, and rules before the meeting starts. This can help reduce disruption and improve the meeting experience for everyone!
Generally, using the same meeting instructions and settings for all class meetings will help students know what to expect.
For example, you can include the following sample instructions when sending meeting invitations:
To join your online lesson:
-
Select the Join Using Microsoft Teams link to enter your virtual classroom.
-
Mute your microphone and keep your video turned off when joining.
-
Select the Join button to join the meeting.
-
To open the chat side panel, select Chat.
-
If you have a question or comment during a lesson, send "Hand up" in the chat for your educator to see.
-
When your educator is ready to hear your question, they will turn on your microphone so you can ask your question or contribute to the conversation.
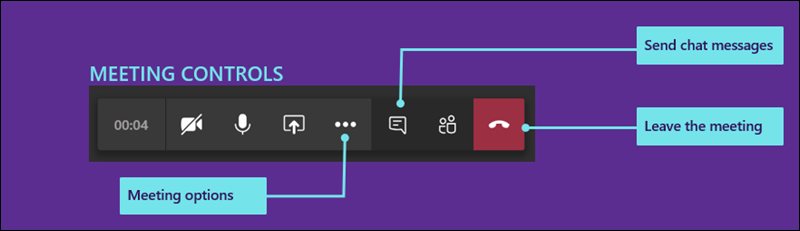
Basic task for running and attending meetings
If you're new to hosting and attending online meetings, this printable guide will help you master the basics quickly.
How to run an effective class meeting
Online classes may be new to you. To make the most of your online classroom experience, you can consider the following:
-
How will you start the meeting with students? Do you have a set of guidelines? Do you want to allow video or not? Do you encourage students to chat with one another to answer questions or should the chat be only for direct questions between the students and educator? Have you implemented a hand-raising system?
-
Do the students understand the online class etiquette rules? For example, you can provide them with a list such as:
-
No individual chats during class.
-
Consequences for class disruptions.
-
Appropriate background requirements
-
How can you encourage participation?
-
Do you have a method in place to check in with students after the class session? Consider an exit survey or exercises the students can do outside of the online class to ensure lessons were properly understood.
How to record a class meeting
Meeting recordings are great resources for students and parents to look back on when they want to reference past lessons. They help support students' understanding and retention of the material presented. When you record a meeting, a searchable transcript and closed captions are automatically created.
To record a meeting, once the meeting has started, go to More options > Start recording. Return to More options to stop recording..
After the meeting ends, you'll receive an email with a link to the recording. The recording will be available in the chat or the channel for seven days.
How to leave a class meeting
When the online class is over, you can leave the meeting by hanging up.